五、开发笔记
1.添加映射
1
2
3
4
5
6
7
8
9
10
11
12
13
| package com.jimcom.springboot.controller;
import org.springframework.stereotype.Controller;
import org.springframework.web.bind.annotation.RequestMapping;
import org.springframework.web.bind.annotation.ResponseBody;
import java.util.Arrays;
import java.util.Map;
@Controller
public class HelloController {
@RequestMapping({"/", "index.html"})
public String index(){
return "index"; // 访问模板引擎里的index视图
}
}
|
1
2
3
4
5
6
7
8
9
10
11
12
13
14
15
16
17
18
| package com.jimcom.springboot.config;
import org.springframework.context.annotation.Configuration;
import org.springframework.web.servlet.config.annotation.ViewControllerRegistry;
import org.springframework.web.servlet.config.annotation.WebMvcConfigurerAdapter;
@Configuration
public class MyConfig extends WebMvcConfigurerAdapter {
public WebMvcConfigurerAdapter webMvcConfigurerAdapter() {
WebMvcConfigurerAdapter adapter = new WebMvcConfigurerAdapter() {
@Override
public void addViewControllers(ViewControllerRegistry registry) {
registry.addViewController("/").setViewName("index");
registry.addViewController("/index.html").setViewName("index");
}
};
// 返回一个自定义的WebMvcConfigurerAdapter实例,在这个实例里面添加映射
return adapter;
}
}
|
2.添加静态资源
1
2
3
4
5
6
7
8
9
10
11
12
13
| <!DOCTYPE html>
<html lang="en" xmlns:th="http://www.thymeleaf.org">
<head>
<title>success</title>
<!--Bootstrap core CSS-->
<link th:href="@{/webjars/bootstrap/4.0.0/css/bootstrap.css}">
<!--My CSS-->
<link th:href="@{/asserts/css/mycss.css}">
</head>
<body>
<img th:src="@{/asserts/img/im.png}">
</body>
</html>
|
bootstrap这些公共样式可以通过webjar来引用,上面是已经在pom.xml添加bootstrap的webjar依赖了,所以要那样引用bootstrap。
<link th:href="@{/asserts/css/mycss.css}">是相对于resources/static的,在这里找自定义的静态资源:
![1534082658915]()
用th:href或者th:src的好处:更改访问路径后,静态资源文件里的路径不需要改变。
1
2
3
4
5
| # application.properties
# 更改了访问路径,要带上/jim才可以访问:http://127.0.0.1:8888/jim
# 如果静态资源文件里用了th:href或者th:src的话,那么这些文件里的路径设置就不用
# 更改了
server.context-path=/jim
|
4.拦截器
- 开发期间模板引擎页面修改以后,想要实时生效:
- 通过在配置文件配置
spring.thymeleaf.cache=false禁用模板引擎的缓存 - 如果用IDEA,页面修改后ctrl+f9,让IDEA进行编译
- 登陆错误消息的显示
1
| <p th:text="${msg}" th:if="${not #strings.isEmpty(msg)}"></p>
|
- 登陆控制器
1
2
3
4
5
6
7
8
9
10
11
12
13
14
15
16
17
18
19
20
21
22
23
24
25
26
| package com.jimcom.springboot.controller;
import org.springframework.stereotype.Controller;
import org.springframework.web.bind.annotation.PostMapping;
import org.springframework.web.bind.annotation.RequestMapping;
import org.springframework.web.bind.annotation.RequestMethod;
import org.springframework.web.bind.annotation.RequestParam;
import org.thymeleaf.util.StringUtils;
import java.util.Map;
@Controller
public class LoginController {
// @RequestMapping(value = "/user/login", method = RequestMethod.POST)
@PostMapping(value = "/user/login") // post方式提交的数据
public String login(@RequestParam("username") String username, // @RequestParm表示username只能来自请求中
@RequestParam("password") String password,
Map<String, Object> map) { // 加入一个map,可以往视图中输入信息
if(!StringUtils.isEmpty(username) && "123".equals(password)) { // StringUtils是String的工具类
// 登陆成功,防止表单重复提交,可以重定向到主页,然后做个拦截器,只有
// 通过登陆的人才能去到这个主页
return "redirect:/mian.html"; // 重定向的写法
}else {
// 登陆失败,重回到登陆页面,并且返回信息msg,值为"用户名密码错误"
map.put("msg", "用户名密码错误");
return "login";
}
}
}
|
其他方式提交数据:@DeleteMapping, @PutMapping, @GetMapping。
表单要提交数据,里面的input要有name属性。
添加拦截器:
1
2
3
4
5
6
7
8
9
10
11
12
13
14
15
16
17
18
19
20
21
22
23
24
25
26
27
28
29
30
31
| package com.jimcom.springboot.component;
import org.springframework.web.servlet.HandlerInterceptor;
import org.springframework.web.servlet.ModelAndView;
import javax.servlet.http.HttpServletRequest;
import javax.servlet.http.HttpServletResponse;
/**
* 登录检查
*/
public class LoginHandlerInterceptor implements HandlerInterceptor {
// 重写接口实现类:Ctrl+I,IDEA快捷键
@Override
public boolean preHandle(HttpServletRequest request, HttpServletResponse response, Object handler) throws Exception {
Object user = request.getSession().getAttribute("loginUser"); // 获取session的属性值
if (user == null) {
// 未登录,返回登录页面
request.setAttribute("msg", "没有权限请先登录");
// 接着,让请求获取一个转发器,让请求和响应转发到/index.html页面上
request.getRequestDispatcher("/index.html").forward(request, response);
return false;
}else {
// 已登录,放行请求
return true;
}
}
@Override
public void postHandle(HttpServletRequest request, HttpServletResponse response, Object handler, ModelAndView modelAndView) throws Exception {
}
@Override
public void afterCompletion(HttpServletRequest request, HttpServletResponse response, Object handler, Exception ex) throws Exception {
}
}
|
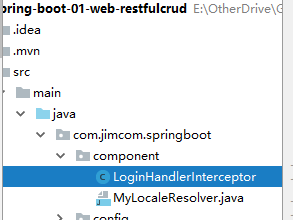
位置:
![1534130878693]()
- 控制器里要添加一个
session
1
2
3
4
5
6
7
8
9
10
11
12
13
14
15
16
17
18
19
20
21
22
23
24
25
| package com.jimcom.springboot.controller;
import org.springframework.stereotype.Controller;
import org.springframework.web.bind.annotation.PostMapping;
import org.springframework.web.bind.annotation.RequestMapping;
import org.springframework.web.bind.annotation.RequestMethod;
import org.springframework.web.bind.annotation.RequestParam;
import org.thymeleaf.util.StringUtils;
import javax.servlet.http.HttpSession;
import java.util.Map;
@Controller
public class LoginController {
@PostMapping(value = "/user/login")
public String login(@RequestParam("username") String username,
@RequestParam("password") String password,
Map<String, Object> map, HttpSession session) { // 添加session
if(!StringUtils.isEmpty(username) && "123".equals(password)) {
// 如果验证成功,那么就会将值送往session,拦截器会利用seesion获取到的loginUser属性值进行判断
session.setAttribute("loginUser", username);
return "redirect:/mian.html";
}else {
map.put("msg", "用户名密码错误");
return "login";
}
}
}
|
- 页面如何获取到
session数据:
1
2
3
4
5
6
7
8
9
10
11
12
13
| <!DOCTYPE html>
<html lang="en" xmlns:th="http://www.thymeleaf.org">
<head>
<title>success</title>
<!--Bootstrap core CSS-->
<link th:href="@{/webjars/bootstrap/4.0.0/css/bootstrap.css}">
<!--My CSS-->
<link th:href="@{/asserts/css/mycss.css}">
</head>
<body>
[[${session.loginUser}]]已登录 <!--session.xxx-->
</body>
</html>
|
![1534082658915]()

