5.表单案例笔记
1.静态资源路径:{{ asset() }}
1
| <link href="{{ asset('static/css/bootstrap.min.css') }}" rel="stylesheet">
|
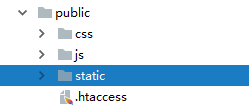
这个路径是相对于public文件夹下的,也就是文件位置:![2018-08-07_134524]()
表单分页
控制器下用Student::paginate(num)取得所有的数据,然后将数据再传给视图。
1
2
3
4
5
6
7
8
9
10
11
12
13
14
| <?php
namespace App\Http\Controllers;
use App\Student;
use Illuminate\Http\Request;
use Illuminate\Support\Facades\Session;
class StudentController extends Controller
{
public function index() {
$students = Student::paginate(3); // '3'表示每页显示3条记录
return view('student.index', [
'students' => $students,
]);
}
}
|
1
| 在需要用到分页的视图里,直接` {{ $students->render() }}`就行了,这条语句会自动生成含有`ul`和`li`的分页信息的。
|
1
2
3
4
5
| <!--student.index视图的分页内容-->
<!--分页-->
<div class="pull-right">
{{ $students->render() }}
</div>
|
- 默认选中项
1
2
3
4
| <ul class="nav nav-pills nav-stacked">
<li role="presentation" class="{{ Request::getPathInfo() == '/student/index' ? 'active' : '' }}"><a href="{{ url('student/index') }}">学生列表</a></li>
<li role="presentation" class="{{ Request::getPathInfo() == '/student/create' ? 'active' : '' }}"><a href="{{ url('student/create') }}">新增学生</a></li>
</ul>
|
用Request::getPathInfo()判断当前路径是否/student/index或者/student/create,是的话那就active,表示选中,不然就为空 ,不选中。注意/student/index和/student/create最前面的/是要有的。
- 表单提交
1
2
3
4
5
6
7
8
9
10
11
12
13
14
15
16
17
18
19
20
| <form action="{{ url('student/save') }}" method="POST">
<!-- 1.设置action路径为'student/save',即提交到student/save -->
<label for="inputName" >姓名:</label>
<input type="text" name="Student[name]" id="inputName" placeholder="请输入姓名">
<!-- 2.将各input的name属性都设为统一的数组,即统一都为Student的数组,只是下标不一样 -->
<label for="inputAge">年龄:</label>
<input type="text" name="Student[age]" id="inputAge" placeholder="请输入年龄">
<div>
<label>性别:</label>
<div>
<label>
<input type="radio" name="Student[sex]" value="man">男
</label> <!-- 3.注意radio的话可以这么设置,设两次Studnet[sex] -->
<label>
<input type="radio" name="Student[sex]" value="woman">女
</label>
</div>
</div>
<button type="submit">提交</button>
</form>
|
1
| Route::any('student/save', ['uses' => 'StudentController@save']);
|
1
2
3
4
5
6
7
8
9
10
11
| public function save(Request $request){
$data = $request->input('Student');
$student = new Student();
$student->name = $data['name'];
$student->age = $data['age'];
$student->sex = $data['sex'];
if($student->save()) {
return redirect('student/index');
} else {
return redirect()->back();
}
|
1
2
3
4
5
6
7
8
9
10
11
12
13
14
15
16
17
18
19
20
| <form action="" method="POST">
<!-- 1.action没设置,默认提交到当前页面 -->
<label for="inputName" >姓名:</label>
<input type="text" name="Student[name]" id="inputName" placeholder="请输入姓名">
<!-- 2.将各input的name属性都设为统一的数组,即统一都为Student的数组,只是下标不一样 -->
<label for="inputAge">年龄:</label>
<input type="text" name="Student[age]" id="inputAge" placeholder="请输入年龄">
<div>
<label>性别:</label>
<div>
<label>
<input type="radio" name="Student[sex]" value="man">男
</label> <!-- 3.注意radio的话可以这么设置,设两次Studnet[sex] -->
<label>
<input type="radio" name="Student[sex]" value="woman">女
</label>
</div>
</div>
<button type="submit">提交</button>
</form>
|
1
| 不用添加一条路由,只是注意当前页面路由要能有POST方法:
|
1
| Route::any('student/create', ['uses' => 'StudentController@create']);
|
1
2
3
4
5
6
7
8
9
10
11
| public function create(Request $request){
if ($request->isMethod('POST')) { // 添加这个判断
$data = $request->input('Student');
if (Student::create($data)) { // 调用create()会采用批量赋值,所以要确保model中要有protected $fillable
return redirect('student/index');
} else {
return redirect()->back();
}
}
return view('student.create'); // 不是POST方法的话,就直接跳转到create视图中去
}
|
- 操作提示
创建一个提示信息子视图:
1
2
3
4
5
6
7
8
9
10
11
12
13
14
15
16
17
18
19
| <!--message.blade.php-->
@if (Session::has('success'))
<!--成功提示框-->
<div class="alert alert-success alert-dismissable" role="alert">
<button type="button" class="close" data-dismiss="alert" aria-label="Close">
<span aria-hidden="true">×</span>
</button>
<strong>成功!!</strong>{{ Session::get('success') }}!
</div>
@endif
@if (Session::has('error'))
<!--失败提示框-->
<div class="alert alert-danger alert-dismissable" role="alert">
<button type="button" class="close" data-dismiss="alert" aria-label="Close">
<span aria-hidden="true">×</span>
</button>
<strong>失败!!</strong>{{ Session::get('error') }}!
</div>
@endif
|
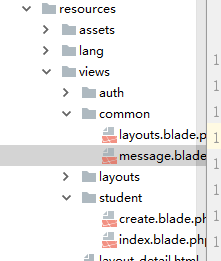
位置:![2018-08-07_200359]()
哪个视图需要这个信息提示框就直接@include('common.message')过去。
控制器中使用:
1
2
3
4
5
6
7
8
9
10
| public function create(Request $request){
if ($request->isMethod('POST')) {
$data = $request->input('Student');
if (Student::create($data)) {
return redirect('student/index')->with('success', '添加成功');
// 在控制器中调用暂存数据的方法,只能访问一次
} else {
return redirect()->back();
}
}
|
这样,当数据保存成功然后返回的index页面时,就会向session中注入success的属性信息,当common.message页面中判断session属性存在时,就会显示信息在有@include('common.message')的视图里。
记住,一定要将需要session的路由加进到web中间件中:
1
2
3
4
5
| Route::group(['middleware' => ['web']], function () {
Route::get('student/index', ['uses' => 'StudentController@index']);
Route::any('student/create', ['uses' => 'StudentController@create']);
Route::post('student/save', ['uses' => 'StudentController@save']);
});
|
中间件web还能防止xxs攻击,所以,如果路由里有表单提交的话,一定要在表单视图中加入{{ csrf_field() }}。
1
2
3
4
5
6
7
8
9
10
11
| <!--create.blade.php-->
@section('content')
<form action="{{ url('student/save') }}" method="POST">
{{ csrf_field() }} <!--防止xxs攻击-->
<label for="inputName" >姓名:</label>
<input type="text" name="Student[name]" id="inputName" placeholder="请输入姓名">
<label for="inputAge">年龄:</label>
<input type="text" name="Student[age]" id="inputAge" placeholder="请输入年龄">
<button type="submit">提交</button>
</form>
@stop
|
- 表单数据验证
1
2
3
4
5
6
7
8
9
10
11
12
13
14
15
16
17
18
19
20
21
22
23
| public function create(Request $request){
if ($request->isMethod('POST')) {
$this->validate($request, [
'Student.name' => 'required|min:2|max:5',// 数组形式要写成这样子Student.name <= Student[name]
'Student.age' => 'required|integer|max:2',
'Student.sex' => 'required|integer'
], [
'required' => ':attribute 为必选项',
'min' => ':attribute 长度不符合要求',
'integer' => ':attribute 必须为整数',
'max' => ':attribute 长度不符合要求',
], [
'Student.name' => '姓名',
'Student.age' => '年龄',
'Student.sex' => '性别',
]);
$data = $request->input('Student');
if (Student::create($data)) { // 调用create()会采用批量赋值,所以要确保model中要有protected $fillable
return redirect('student/index')->with('success', '添加成功');
} else {
return redirect()->back();
}
}
|
验证通过是,程序将会继续往下执行,不通过时,表单将会重定向到上个页面并将错误抛给session,该错误属性是$errors,这个$errors是个数组,可以在全局的视图中捕获的。
然后,自定义错误内容:
1
2
3
4
5
6
7
8
9
10
11
12
13
14
| $this->validate($request, [
'Student.name' => 'required|min:2|max:5',// 数组形式要写成这样子Student.name <= Student[name]
'Student.age' => 'required|integer|max:2',
'Student.sex' => 'required|integer'
], [
'required' => ':attribute 为必选项', // :attribute是个占位符,表示对应的Student.name、Student.age、Student.sex
'min' => ':attribute 长度不符合要求',
'integer' => ':attribute 必须为整数',
'max' => ':attribute 长度不符合要求',
], [
'Student.name' => '姓名',
'Student.age' => '年龄',
'Student.sex' => '性别',
]);
|
1
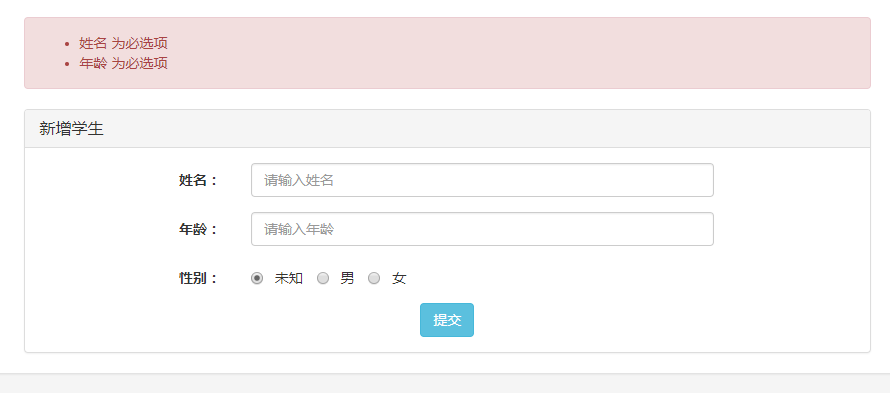
| 譬如:当因为`Student.name`的`required`不通过验证时,就会抛出`姓名 为必选项`。
|
![2018-08-07_210700]()
1
| 如果不这样自定义的话,那抛出来的错误内容信息就是`Student.name is required.`,这个不太友好。
|
将用于捕获验证错误信息的程序放入一个视图:
1
2
3
4
5
6
7
8
9
10
| // common.validator.blade.php
@if (count($errors))
<div class="alert alert-danger">
<ul>
@foreach($errors->all() as $error) // 将所有的错误都输出
<li>{{ $error }}</li>
@endforeach
</ul>
</div>
@endif
|
哪个视图需要输出验证错误信息的再来@include('common.validator'):
1
2
3
4
5
6
7
8
9
10
11
| @section('content')
@include('common.validator') <!--需要输出验证信息的地方-->
<form action="{{ url('student/save') }}" method="POST">
{{ csrf_field() }}
<label for="inputName" >姓名:</label>
<input type="text" name="Student[name]" id="inputName" placeholder="请输入姓名">
<label for="inputAge">年龄:</label>
<input type="text" name="Student[age]" id="inputAge" placeholder="请输入年龄">
<button type="submit">提交</button>
</form>
@stop
|
1
2
3
4
5
6
7
8
9
10
11
12
13
14
15
16
17
18
19
20
21
22
23
24
25
26
27
28
| public function create(Request $request){
if ($request->isMethod('POST')) {
$validator = \Validator::make($request->input(), [
'Student.name' => 'required|min:2|max:5',
'Student.age' => 'required|integer|max:2',
'Student.sex' => 'required|integer'
], [
'required' => ':attribute 为必选项',
'min' => ':attribute 长度不符合要求',
'integer' => ':attribute 必须为整数',
'max' => ':attribute 长度不符合要求',
], [
'Student.name' => '姓名',
'Student.age' => '年龄',
'Student.sex' => '性别',
]);
if ($validator->fails()) { // 这种方法验证也就是手动验证,在函数体里面还能做其他的事
return redirect()->back()->withErrors($validator);
} // 注意要用withErrors($validator)注册错误信息
$data = $request->input('Student');
if (Student::create($data)) { // 调用create()会采用批量赋值,所以要确保model中要有protected $fillable
return redirect('student/index')->with('success', '添加成功');
} else {
return redirect()->back();
}
}
return view('student.create');
}
|
在视图中调用指定的错误信息:{{ $errors->first('Student.name') }},如果有自定义错误内容姓名 为必选项,则输出的是错误对应(Student.name)的自定义内容。
- 数据保持
只需要在上述表单验证代码中加入->withInput():
![2018-08-07_222555]()
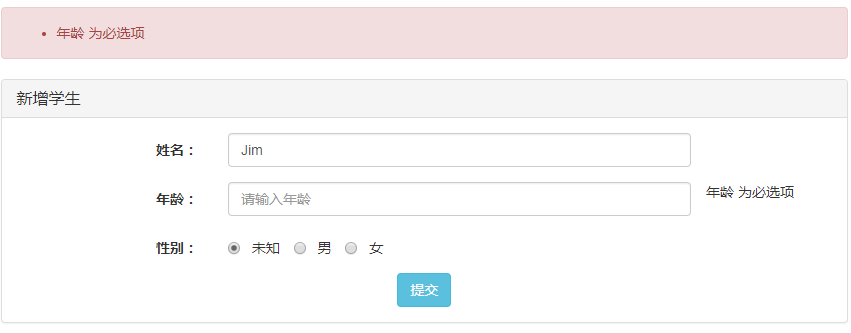
withInput()自动默认将$request作为参数传进去,然后再在需要的input组件添加value="{{ old('Student')['name'] }}"即可:
1
| <input type="text" value="{{ old('Student')['name'] }}" name="Student[name]" class="form-control" id="inputName" placeholder="请输入姓名">
|
这样子,在提交表单而发生错误后,重定向到原先的表单填写页面时,它会自动补全在input之前填过的信息:![2018-08-07_223016]()
注:
min:2|max:5: 当要验证的值为数字时,那么这个数字要大于等于2小于等于5(4满足要求); 当要验证的值为字符串,那么这个字符串不管是中英混合,还是全英,还是全文,它的长度要大于等于2小于等于5(hh哈哈长度为4,满足要求)。
- 自定义数据库取出来的值
譬如,当存储性别时(有’未知‘,’男‘, ’女‘),数据库真正所对应存储的是10, 20, 30。所以这时候就要自定义数据库取出来的值。
首先,在对应的model中写入一个函数:
1
2
3
4
5
6
7
8
9
10
11
12
13
14
15
16
17
18
19
20
21
22
23
24
25
26
27
28
29
30
31
32
33
| // App\Student.php
<?php
namespace App;
use Illuminate\Database\Eloquent\Model;
class Student extends Model
{
protected $fillable = ['name', 'age', 'sex'];
protected $table = 'student';
public $timestamps = true;
protected function getDateFormat()
{
return time();
}
protected function asDateTime($value)
{
return $value;
}
// 以下函数能将数字转化为对应的汉字,数字用来存储,汉字用来显示
const SEX_UN = 10; // 定义三个常量
const SEX_BOY = 20;
const SEX_GIRL = 30;
public function sex($ind = null) {
$arr = [
self::SEX_UN => '未知',
self::SEX_BOY => '男',
self::SEX_GIRL => '女',
];
if ($ind !== null) { // 注意不等于是 !==
return array_key_exists($ind, $arr) ? $arr[$ind] : $arr[self::SEX_UN];
}
return $arr;
}
}
|
Studen这个model里有个sex函数,sex()时能将所有的性别取出来,传入相应的index时能取出对应的汉字性别。
接着,在控制器中将model注入到视图中去。
1
2
3
4
5
6
| public function create(){
$student = new Student(); //先将model实例化
return view('student.create', [
'student' => $student // 然后再注入到视图里
]);
}
|
然后,在视图中就可以调用model的性别转化函数sex()。
1
2
3
4
5
6
7
8
| @foreach($students as $student)
<tr>
<td>{{ $student->id }}</td>
<td>{{ $student->name }}</td>
<td>{{ $student->age }}</td>
<td>{{ $student->sex($student->sex) }}</td>
</tr> <!--储存到model中的性别是个数字,$student->sex是个数字,$student->sex()才将这个数字转化对应性别为中文汉字-->
@endforeach
|
1
2
3
4
5
| @foreach($student->sex() as $ind=>$val)
<label class="radio-inline"> <!--sex()返回一个数组,$ind是10,20,30,$val是未知,男,女-->
<input type="radio" name="Student[sex]" value="{{ $ind }}"> {{ $val }}
</label> <!--最后提交到数据库是,如果是未知,那Student[sex]=10,男:Student[sex]=10等-->
@endforeach
|
1
| 上面这样写就有这个效果:,就不必在页面上写很多个`input`标签了。
|
- 遇到的坑:
App\Student::sex must return a relationship instance
情况:
1
| 在控制器中,当访问`student.create`时,会以这样注入一个model实例的方式:
|
1
2
3
4
5
6
| public function create(){
$student = new Student();
return view('student.create', [
'student' => $student,
]);
}
|
1
| 使得`create`视图里的`input`组件不用写多个,也能变成:
|
1
2
3
4
5
| @foreach($student->sex() as $ind=>$val)
<label class="radio-inline">
<input type="radio" name="Student[sex]" value="{{ $ind }}"> {{ $val }}
</label>
@endforeach
|
1
| 但是,`create`视图的这个部分其实也是`@include('student._form')`的,上面 的`input`标签也是放在这个通用的`_form`视图里的。所以实际上`_form.blade.php`:
|
1
2
3
4
5
6
7
| @foreach($student->sex() as $ind=>$val)
<label class="radio-inline">
<input type="radio" name="Student[sex]" value="{{ $ind }}"
{{ isset($student->sex) && ($student->sex == $ind) ? 'checked' : '' }}
> {{ $val }}
</label>
@endforeach
|
{{ isset($student->sex) && ($student->sex == $ind) ? 'checked' : '' }}的意思是,如果控制器注入了一个Student实例,那么判断这个实例的sex有没有被设置,有的话,就判断$student->sex这个值和$ind相不相等,相等的话,那就这个input默认被选中。相当于,能指定一个input默认被选中。
然而,如果控制器仅仅:
1
2
3
4
| $student = new Student();
return view('student.create', [
'student' => $student,
]);
|
视图直接用$student->sex,不管用在哪里,都会报错。故此,一定要在控制器添加:$student->sex = null;:
1
2
3
4
5
| $student = new Student();
$student->sex = null; // 等于不赋值给$student->sex
return view('student.create', [
'student' => $student,
]);
|
这样,在视图:
1
| {{ isset($student->sex) && ($student->sex == $ind) ? 'checked' : '' }}
|
先判断$student->sex有没有被设置再来做其他事情。
- 视图中url传值:
1
| {{ url('student/update', ['id' => $student->id]) }}
|


